Documentation: HTTP Request Node
Overview
The HTTP Request Node allows you to make HTTP/HTTPS requests to external APIs, web services, or any REST endpoint from your automations. This node supports all standard HTTP methods and multiple authentication types.
When to Use This Node
Use this node when you need to:
- Integrate with third-party APIs (external services, webhooks)
- Send data to external systems
- Query information from web services
- Trigger actions on external platforms (open doors, turn on lights)
- Synchronize data with other systems
- Send commands to IoT devices
Node Configuration
The node has two configuration tabs: Data Configuration and Auth Configuration.
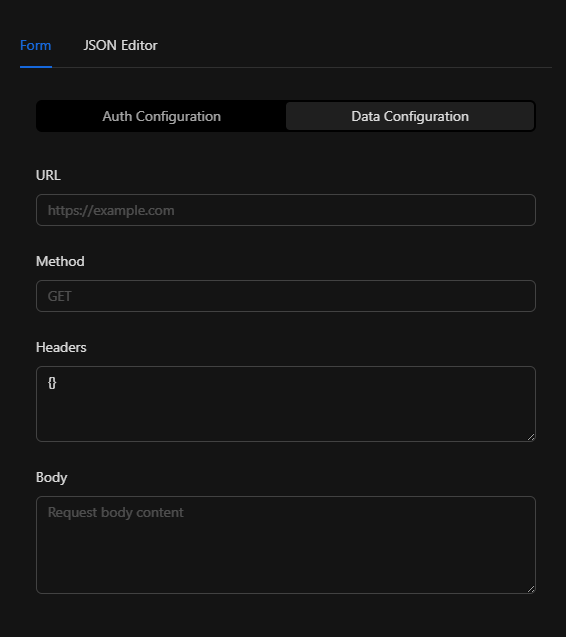
Tab 1: Data Configuration
Step 1: Endpoint URL
- In the "URL" field, enter the complete address of the endpoint you want to request
- Must include the protocol (
http://orhttps://) - Can include query parameters
Examples:
https://api.example.com/v1/users
https://example.com/webhook?event=alert
http://192.168.1.100:8080/api/devices
Note
Using https:// for secure connections is recommended when possible.
Step 2: HTTP Method
- In the "Method" field, select or enter the HTTP method to use
- Common methods:
- GET - Retrieve information (queries, reads)
- POST - Create resources, send data
- PUT - Update complete resources
- PATCH - Partially update resources
- DELETE - Delete resources
- HEAD - Retrieve only headers
- OPTIONS - Query supported methods
Note
The default method is GET. Make sure to use the correct method according to the API documentation.
Step 3: Headers
- In the "Headers" field, enter HTTP headers in JSON format
- Headers are optional but commonly required
- Common headers:
Content-Type- Body content typeAccept- Expected response typeUser-Agent- Client identifier
Example:
{
  "Content-Type": "application/json",
  "Accept": "application/json",
  "User-Agent": "Netsocs-Automation/1.0"
}
For specific content types:
{
  "Content-Type": "application/x-www-form-urlencoded"
}
Note
If you leave this field empty, default headers will be used. Authentication headers are automatically added based on Auth tab configuration.
Step 4: Body (Request Body)
- In the "Body" field, enter the content you want to send
- Only applies to methods: POST, PUT, PATCH
- Format must match the
Content-Typespecified in Headers
Example with JSON:
{
  "name": "John Doe",
  "email": "john@example.com",
  "event": "access_granted",
  "timestamp": "2026-01-28T14:30:45Z"
}
Example with form-urlencoded:
name=John+Doe&email=john@example.com&event=access_granted
Example with plain text:
Alert: Motion detected in restricted area
Note
You can use variables in the body: {"user": "{{userName}}", "event": "{{eventType}}"}
Tab 2: Auth Configuration
The authentication tab allows you to configure credentials to access protected APIs. There are three authentication types available:
Option 1: Basic Auth
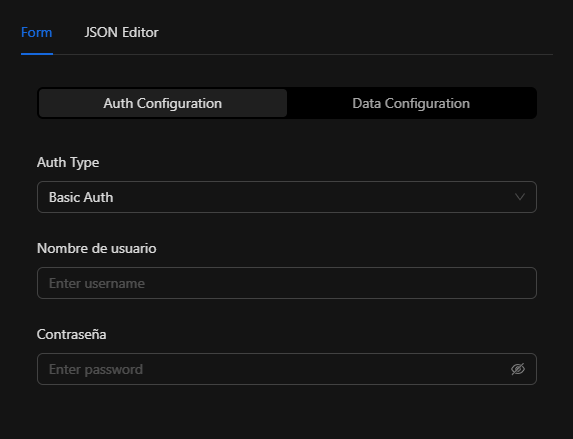
Use this option when the API requires username and password in Basic Authentication format.
Configuration:
- Select "Basic Auth" in the "Auth Type" field
- Username: Enter the username provided by the API
- Password: Enter the password (field is hidden for security)
When to use:
- APIs that require traditional username/password
- Legacy systems using basic HTTP authentication
- IoT devices with simple authentication
Example configuration:
{
  "authType": "basic",
  "authUsername": "admin",
  "authPassword": "my_secure_password"
}
Note
Credentials are automatically Base64 encoded and sent in the Authorization: Basic <credentials> header.
Option 2: Bearer Token
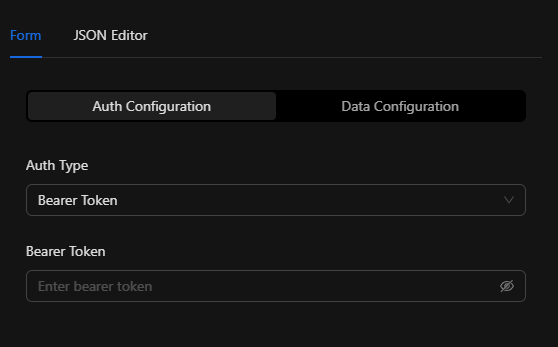
Use this option when the API requires a bearer token, common in modern APIs with OAuth 2.0.
Configuration:
- Select "Bearer Token" in the "Auth Type" field
- Bearer Token: Enter the token provided by the API (field is hidden for security)
When to use:
- APIs with OAuth 2.0
- Services that provide JWT tokens
- Modern cloud platforms (AWS, Azure, GCP)
- Social media APIs (Twitter, Facebook, etc.)
Example configuration:
{
  "authType": "bearer",
  "authToken": "eyJhbGciOiJIUzI1NiIsInR5cCI6IkpXVCJ9..."
}
Where to get the token:
- Usually obtained through a login/authentication endpoint
- Can be a JWT (JSON Web Token)
- Some services provide long-lived tokens in their admin panel
Note
The token is automatically sent in the Authorization: Bearer <token> header.
Option 3: API Key
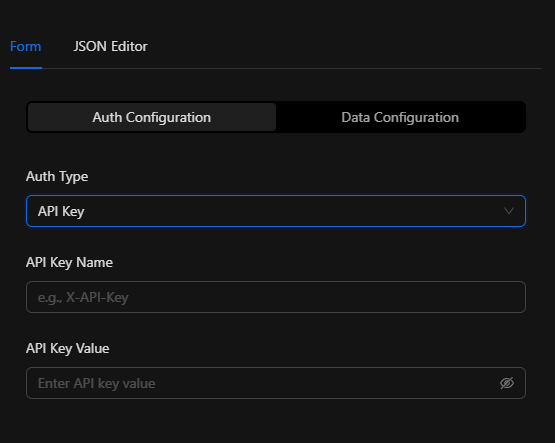
Use this option when the API requires an API key in a custom header.
Configuration:
- Select "API Key" in the "Auth Type" field
- API Key Name: Name of the header where the key will be sent (example:
X-API-Key,api_key,apikey) - API Key Value: The API key value provided by the service (field is hidden for security)
When to use:
- Services using simple API keys
- Public APIs with key authentication
- Weather services, maps, translation, etc.
Common name examples:
X-API-Keyapi_keyapikeyX-Api-TokenAuthorization(in some cases)
Example configuration:
{
  "authType": "apikey",
  "authUsername": "X-API-Key",
  "authPassword": "sk_test_abc123xyz789..."
}
Note
The system automatically adds the header with the specified name and value: <API-Key-Name>: <API-Key-Value>.
Complete JSON Structure
{
  "url": "https://api.example.com/v1/events",
  "method": "POST",
  "headers": {
    "Content-Type": "application/json",
    "Accept": "application/json"
  },
  "body": "{\"event\": \"alert\", \"message\": \"Motion detected\"}",
  "authType": "bearer",
  "authToken": "eyJhbGciOiJIUzI1NiIsInR5cCI6IkpXVCJ9..."
}
Required Fields
url- Endpoint URL (must include protocol)method- HTTP method (GET, POST, PUT, PATCH, DELETE, etc.)
Optional Fields
headers- JSON object with custom headersbody- Request content (for POST, PUT, PATCH)authType- Authentication type:basic,bearer, orapikeyauthUsername- Username (Basic Auth) or API Key nameauthPassword- Password (Basic Auth) or API Key valueauthToken- Token (Bearer Token)
Usage Examples
Example 1: Simple GET without Authentication
Use case: Query public information from an API
Configuration:
- URL:
https://api.openweathermap.org/data/2.5/weather?q=Madrid&appid=API_KEY - Method:
GET - Headers:
{} - Auth: None (API Key in URL)
JSON:
{
  "url": "https://api.openweathermap.org/data/2.5/weather?q=Madrid&appid=abc123",
  "method": "GET",
  "headers": {},
  "body": ""
}
Example 2: POST with Basic Auth
Use case: Create a user in a system with basic authentication
Configuration:
- URL:
https://system.example.com/api/users - Method:
POST - Headers:
{"Content-Type": "application/json"} - Body: User data
- Auth: Basic Auth (admin / password123)
JSON:
{
  "url": "https://system.example.com/api/users",
  "method": "POST",
  "headers": {
    "Content-Type": "application/json"
  },
  "body": "{\"name\": \"John Doe\", \"email\": \"john@example.com\"}",
  "authType": "basic",
  "authUsername": "admin",
  "authPassword": "password123"
}
Example 3: POST with Bearer Token
Use case: Send alert to Slack
Configuration:
- URL:
https://slack.com/api/chat.postMessage - Method:
POST - Headers:
{"Content-Type": "application/json"} - Body: Slack message
- Auth: Bearer Token
JSON:
{
  "url": "https://slack.com/api/chat.postMessage",
  "method": "POST",
  "headers": {
    "Content-Type": "application/json"
  },
  "body": "{\"channel\": \"#alerts\", \"text\": \"Motion detected at Main Entrance\"}",
  "authType": "bearer",
  "authToken": "xoxb-1234567890-1234567890123-abcdefghijklmnopqrstuvwx"
}
Example 4: GET with API Key
Use case: Query data from an API with key
Configuration:
- URL:
https://api.service.com/v1/data - Method:
GET - Auth: API Key (X-API-Key)
JSON:
{
  "url": "https://api.service.com/v1/data",
  "method": "GET",
  "headers": {},
  "body": "",
  "authType": "apikey",
  "authUsername": "X-API-Key",
  "authPassword": "sk_live_abc123xyz789def456ghi012"
}
Example 5: Control IoT Device
Use case: Open a door via device REST API
Configuration:
- URL:
http://192.168.1.50/api/door/open - Method:
POST - Headers:
{"Content-Type": "application/json"} - Body: Command
- Auth: Basic Auth
JSON:
{
  "url": "http://192.168.1.50/api/door/open",
  "method": "POST",
  "headers": {
    "Content-Type": "application/json"
  },
  "body": "{\"duration\": 5, \"reason\": \"authorized_access\"}",
  "authType": "basic",
  "authUsername": "admin",
  "authPassword": "device123"
}
Example 6: Webhook with Variables
Use case: Send event with dynamic data
Configuration:
- URL:
https://webhook.example.com/events - Method:
POST - Body: Data with automation variables
JSON:
{
  "url": "https://webhook.example.com/events",
  "method": "POST",
  "headers": {
    "Content-Type": "application/json"
  },
  "body": "{\"event\": \"{{eventType}}\", \"location\": \"{{location}}\", \"user\": \"{{userName}}\", \"timestamp\": \"{{timestamp}}\"}"
}
HTTP Responses
The node captures the server response and makes it available for subsequent nodes in the automation.
Common Status Codes
| Code | Meaning | Description |
|---|---|---|
| 200 | OK | Successful request |
| 201 | Created | Resource created successfully |
| 204 | No Content | Successful request with no content in response |
| 400 | Bad Request | Request error (invalid data) |
| 401 | Unauthorized | Authentication required or invalid |
| 403 | Forbidden | No permissions to access |
| 404 | Not Found | Resource not found |
| 429 | Too Many Requests | Request rate limit exceeded |
| 500 | Internal Server Error | Server error |
| 503 | Service Unavailable | Service unavailable |
Response Handling
The response includes:
- Status Code: HTTP status code
- Body: Response body (usually JSON)
- Headers: Response headers
Successful response example:
{
  "statusCode": 200,
  "body": {
    "success": true,
    "message": "User created",
    "id": "12345"
  },
  "headers": {
    "content-type": "application/json"
  }
}
Troubleshooting
Error: "Cannot connect to URL"
Cause: Cannot establish connection with the server
Solution:
- Verify the URL is correct and accessible
- Confirm it includes the protocol (
http://orhttps://) - Verify network connectivity from Netsocs server
- If it's a local URL, ensure the service is active
- Check firewall and network rules
Error: "401 Unauthorized"
Cause: Incorrect or missing authentication credentials
Solution:
- Verify the authentication type is correct
- Confirm credentials are valid
- For Bearer Token, verify it hasn't expired
- For API Key, confirm the correct header name
- Review API documentation for expected authentication format
Error: "400 Bad Request"
Cause: Server rejects the request due to invalid data
Solution:
- Verify body format (must be valid JSON if Content-Type is
application/json) - Confirm all required fields are present
- Check data types are correct (numbers as numbers, not strings)
- Validate the HTTP method is correct
- Consult API documentation for expected format
Error: "404 Not Found"
Cause: Endpoint doesn't exist
Solution:
- Verify the URL is exactly as documented by the API
- Confirm there are no typos
- Check API version in URL (v1, v2, etc.)
- Some endpoints require parameters in URL
Error: "SSL Certificate Error"
Cause: HTTPS certificate issue
Solution:
- If it's a development server, consider using
http://temporarily - Verify the server certificate is valid
- For self-signed certificates, additional configuration may be needed
- Confirm Netsocs server date/time is correct
Body is not sent correctly
Cause: Incorrect format or encoding
Solution:
- Ensure body is a valid string
- If it's JSON, use double quotes (
") not single (') - Escape special characters if necessary
- Verify
Content-Typeheader matches body format - For JSON, use:
{"Content-Type": "application/json"}
Variables are not replaced in body
Cause: Incorrect variable syntax
Solution:
- Use correct format:
{{variableName}} - Verify variable exists in automation context
- If body is JSON, text variables must be quoted:
"name": "{{userName}}" - For numeric variables:
"age": {{userAge}}(no quotes)
Best Practices
1. Security
- Always use HTTPS when possible to protect credentials in transit
- Don't expose credentials in logs or error messages
- Rotate tokens and keys periodically according to security policies
- Use environment variables to store sensitive credentials
- Limit permissions of accounts used for authentication
2. Error Handling
- Implement retries for temporary network failures
- Validate responses before processing data
- Log requests for debugging (without exposing credentials)
- Notify failures to administrators when critical
- Appropriate timeouts to avoid blocking
3. Performance
- Avoid unnecessary requests using cache when possible
- Respect rate limits of APIs
- Use appropriate methods (GET for reads, POST for writes)
- Compress large data when API supports it
- Pagination for large datasets
4. Documentation
- Document each integration with purpose and configuration
- Include examples of requests and responses
- Keep record of changes in external APIs
- Version configurations when possible
5. Testing
- Test in development before production
- Validate all possible status codes
- Test with invalid credentials to verify error handling
- Simulate timeouts and network errors
- Document expected behavior
Industry Use Cases
Access Control System Integration
{
  "url": "https://access-system.example.com/api/v1/doors/open",
  "method": "POST",
  "headers": {
    "Content-Type": "application/json"
  },
  "body": "{\"door_id\": \"MAIN-ENTRANCE\", \"duration\": 5, \"authorized_by\": \"{{userName}}\"}",
  "authType": "bearer",
  "authToken": "eyJhbGciOiJIUzI1NiIsInR5cCI6IkpXVCJ9..."
}
Incident Management System Notification
{
  "url": "https://incidents.example.com/api/create",
  "method": "POST",
  "headers": {
    "Content-Type": "application/json"
  },
  "body": "{\"title\": \"Security Alert\", \"description\": \"Motion detected in restricted area\", \"priority\": \"high\", \"location\": \"{{location}}\"}",
  "authType": "apikey",
  "authUsername": "X-API-Key",
  "authPassword": "sk_live_abc123xyz"
}
Update External Database
{
  "url": "https://api.database.com/v2/records",
  "method": "POST",
  "headers": {
    "Content-Type": "application/json"
  },
  "body": "{\"event_type\": \"{{eventType}}\", \"timestamp\": \"{{timestamp}}\", \"data\": {{eventData}}}",
  "authType": "basic",
  "authUsername": "api_user",
  "authPassword": "secure_password_123"
}
Query IoT Device Status
{
  "url": "http://192.168.1.100/api/status",
  "method": "GET",
  "headers": {
    "Accept": "application/json"
  },
  "authType": "apikey",
  "authUsername": "api_key",
  "authPassword": "device_key_xyz789"
}
Frequently Asked Questions
Q: Can I make requests to services without HTTPS?
A: Yes, but only for development environments or secure internal networks. Avoid sending credentials over HTTP in production.
Q: How do I get a Bearer Token?
A: Usually obtained by making a login/authentication request to the API endpoint. Some services provide long-lived tokens in their panel.
Q: Can I use multiple authentication types?
A: No, you can only use one type at a time. Choose the one required by the API according to its documentation.
Q: What happens if the request fails?
A: The node captures the error and makes it available in the automation. You can use conditional nodes to handle failures.
Q: Can I use variables in the URL?
A: Yes, you can use variables: https://api.example.com/users/{{userId}}/profile
Q: Is there a limit on body size?
A: It depends on the destination server. Most APIs have documented limits (commonly 1-10 MB).
Q: How do I handle paginated responses?
A: You'll need to create a flow that makes multiple requests, incrementing the page parameter in each iteration.
Q: Can I download files?
A: Yes, but consider size and storage. For large files, consider streaming or temporary storage.