Documentation: Object State Change Trigger
Overview
The Object State Change Trigger is an automation component that executes actions when one or more objects transition from one state to another. This trigger continuously monitors the selected objects and fires when the configured state change conditions are met.
When to Use This Trigger
Use this trigger when you need to: - Run automatic actions when an object changes state (e.g., when a light turns on or off) - Monitor specific transitions between states (e.g., when a document goes from "pending" to "approved") - Trigger automations based on changes to specific state properties - Create rules that run only when an object remains in a state for a given duration
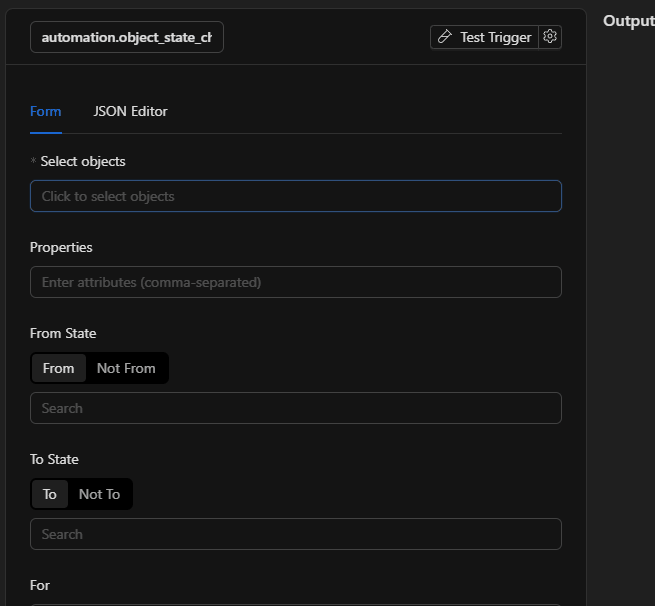
Trigger Configuration
Step 1: Select Objects
- Click the "Select objects" field
- A modal opens with a tree of available objects
- Select one or more objects to monitor by checking the corresponding boxes
- You can search for objects using the search bar
- Click "OK" to confirm your selection
Note
You must select at least one object. Selected objects appear as tags below the field. You can remove an object by clicking the "X" on its tag.
Step 2: Configure Attributes (Optional)
Attributes are additional state properties you can monitor alongside the object's main state.
- In the "Attributes" field, enter the keys of the state properties you want to monitor
- Separate multiple attributes with commas (
,) - Example:
temperature, humidity, battery_level
Note
- If you leave this field empty, only the object's main state is monitored
- If you specify attributes, both the main state and all specified state properties are monitored
Step 3: Configure "From" State
The "From" state defines the object's previous state before the change.
- Select the condition type:
- "From": The object must change from one of these states
-
"Not From": The object must NOT change from these states
-
Enter states separated by commas (
,) - Example for "From":
off, standby - Example for "Not From":
locked, maintenance
Features: - You can enter multiple states separated by commas - The system suggests available states based on the first selected object - You can type to search for specific states
Step 4: Configure "To" State
The "To" state defines the state the object must change to.
- Select the condition type:
- "To": The object must change to one of these states
-
"Not To": The object must NOT change to these states
-
Enter states separated by commas (
,) - Example for "To":
on, active - Example for "Not To":
cancelled, error
Features: - You can enter multiple states separated by commas - The system suggests available states - You can type to search for specific states
Step 5: Configure "For" Duration (Optional)
The "For" field lets you require that the object remain in the new state for a minimum time before the trigger fires.
- Enter the time in HH:MM:SS format (hours:minutes:seconds)
- Valid examples:
00:00:15— 15 seconds00:05:00— 5 minutes01:30:00— 1 hour and 30 minutes02:15:30— 2 hours, 15 minutes and 30 seconds
Note: - This field is optional. If left empty, the trigger fires immediately when conditions are met - If you specify a duration, the trigger only fires if the object stays in the new state for that period
Usage Examples
Example 1: Turn on light when motion is detected
Configuration:
- Objects: Motion sensor (main room)
- Attributes: (empty)
- From: inactive
- To: active
- For: 00:00:05 (5 seconds)
Result: When the motion sensor changes from "inactive" to "active" and stays active for 5 seconds, the trigger fires.
Example 2: Notify when a door closes (but not when it locks)
Configuration:
- Objects: Main door
- Attributes: (empty)
- From: open
- Not To: locked
- To: closed
- For: (empty)
Result: The trigger fires when the door changes from "open" to "closed", but NOT when it changes to "locked".
Example 3: Monitor device temperature
Configuration:
- Objects: Room thermostat
- Attributes: temperature
- From: (empty)
- To: (empty)
- For: 00:01:00 (1 minute)
Result: The trigger fires when the thermostat's "temperature" property changes and remains stable for 1 minute.
Example 4: Detect when a project is approved
Configuration:
- Objects: Project X
- Attributes: (empty)
- Not From: cancelled, rejected
- To: approved
- For: (empty)
Result: The trigger fires when the project changes to "approved", but only if the previous state was NOT "cancelled" or "rejected".
Operating Rules
Combining Conditions
All configured conditions must be satisfied at the same time for the trigger to fire:
- If you specify "From", the previous state must be in the list
- If you specify "Not From", the previous state must NOT be in the list
- If you specify "To", the new state must be in the list
- If you specify "Not To", the new state must NOT be in the list
- If you specify "For", the object must remain in the new state for that duration
Multiple Objects
When you select multiple objects: - The trigger fires when any of the selected objects meets the conditions - Each object is evaluated independently
Multiple Attributes
When you specify multiple attributes: - The trigger fires when any of the specified attributes changes and meets the conditions - Attributes are monitored in addition to the main state
JSON Editor (Advanced)
If you are comfortable with technical configuration, you can edit the setup directly in JSON using the "JSON Editor" tab. The structure is:
{
  "ruleSet": {
    "objects_id": ["object-id-1", "object-id-2"],
    "attributes": ["attribute1", "attribute2"],
    "from": ["state1", "state2"],
    "to": ["state3", "state4"],
    "not_from": ["state5"],
    "not_to": ["state6"],
    "for": "00:05:00"
  },
  "config": {}
}
Troubleshooting
The trigger does not fire
- Check that the selected objects exist and are active
- Confirm that the specified states are valid for the selected objects
- Ensure conditions are not contradictory (e.g., "From: active" and "Not From: active")
- If you use "For", make sure the object stays in the new state long enough
States do not appear in suggestions
- Ensure at least one object is selected first
- Verify that the object has available states configured
- Try typing the state name manually if it does not appear in suggestions
The "For" field shows an error
- Check the format: it must be exactly
HH:MM:SS - Use two digits for hours, minutes, and seconds
- Use valid values: hours (00–23), minutes (00–59), seconds (00–59)
Best Practices
- Select specific objects rather than monitoring all objects in the system
- Use "For" to reduce false triggers when states change rapidly
- Combine "From" and "To" for more precise conditions
- Use "Not From" and "Not To" to exclude unwanted states
- Test your configuration with manual state changes before relying on the automation
- Give triggers descriptive names to make maintenance easier
Frequently Asked Questions
Q: Can I monitor only attributes without the main state?
A: No. The main state is always monitored. Attributes are monitored in addition to the main state.
Q: What happens if an object changes state multiple times quickly?
A: Each change is evaluated separately. If you use "For", the trigger fires only when the object remains in the new state for the specified duration.
Q: Can I use this trigger with objects of different types?
A: Yes, but note that available states are based on the first selected object. Ensure the specified states are valid for all selected objects.
Q: Does the trigger fire when I change the state manually?
A: Yes. The trigger fires on any state change, whether automatic or manual.