Documentation: Alarm Node
Overview
The Alarm Node is an action node that allows you to arm or disarm one or more alarm panels registered in the platform directly from an automation flow (for example, Ajax intrusion panels, perimeter alarm panels, etc.).
When this action executes, the command is sent to the corresponding alarm panel's driver, remotely changing its operational state. This lets you integrate physical security into your IoT automation logic: arm a plant's perimeter at a set time, disarm a zone when an operator validates their access, or re-arm a panel after detecting it was deactivated outside business hours.
When to use this node?
Use this node when you need to:
- Automatically arm one or more alarm panels (for example, at the nightly close of a warehouse or industrial plant using a schedule trigger).
- Disarm alarm panels in a controlled manner (for example, at the start of the morning shift or when an access reader validates an authorized supervisor).
- Apply the same arm/disarm command to multiple panels at once (for example, all panels across a set of industrial buildings).
- React to IoT environment events by arming or disarming physical security as part of a larger flow.
Node Configuration
The node has two configuration tabs at the top: Form and JSON Editor.
Form View
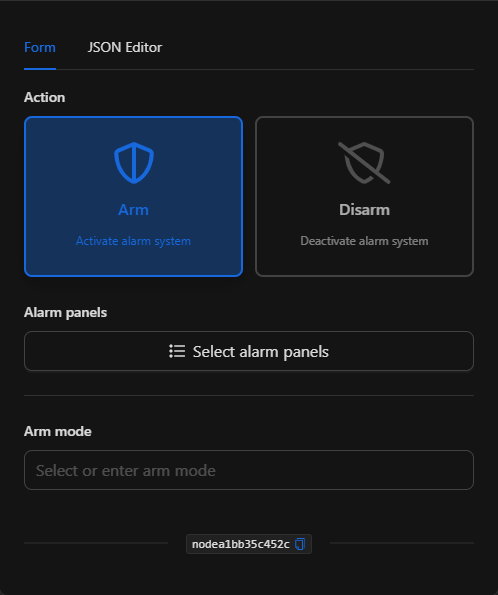
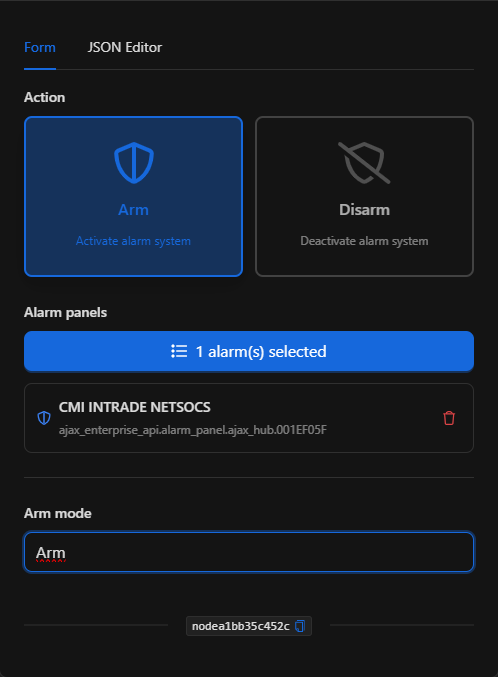
1. Action *Required
Defines the operation to perform on the selected panels. It is chosen via two visual cards:
- Arm: Activates the alarm system. Selecting this option enables the Arm mode field.
- Disarm: Deactivates the alarm system. Selecting this option hides and clears the Arm mode field, since it does not apply when disarming.
2. Alarm Panels *Required
Allows you to select one or more alarm panels on which the action will be applied.
- Click the
Select alarm panelsbutton to open the selector modal. - The selector is automatically filtered to show only objects of type alarm panel (
alarm_panel). You can navigate through the Devices tab and expand each device to locate the desired panel. - Check the checkbox of each panel you want to include and confirm with
Done.
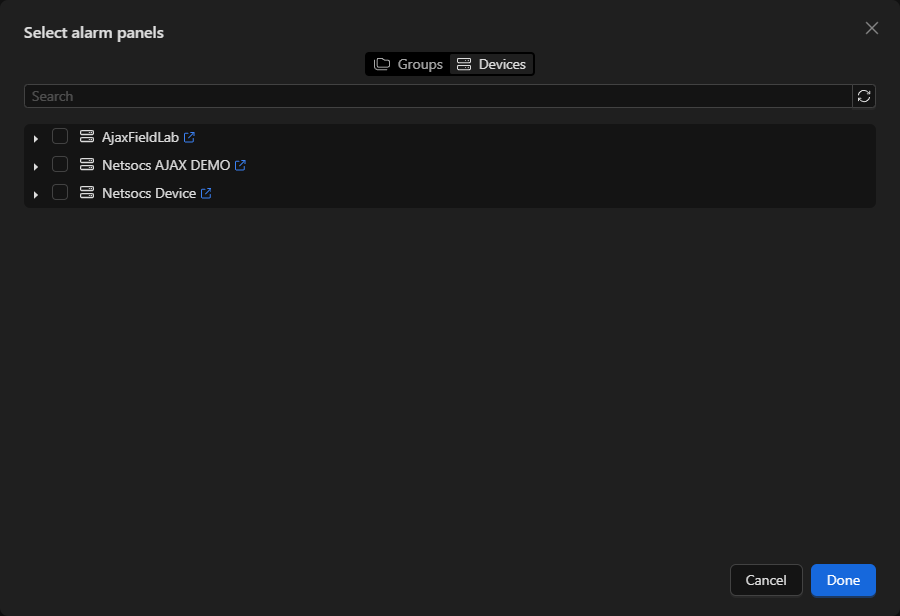
Once selected, the panels are displayed as cards below the button, showing their name and unique ID. You can remove any of them with the trash icon.
3. Arm Mode *Conditional
This field only appears when the action is Arm. It defines the mode in which the panel will be armed.
- It is an autocomplete field: it shows the available arm modes for the selected panel (for example,
Armfor full arming). You can also manually type a mode value if your integration supports it.
NOTE: The available arm modes depend on the type and brand of the alarm panel. Some panels only expose a single arm mode, while others may offer modes such as full arm, night arm, or partial arm.
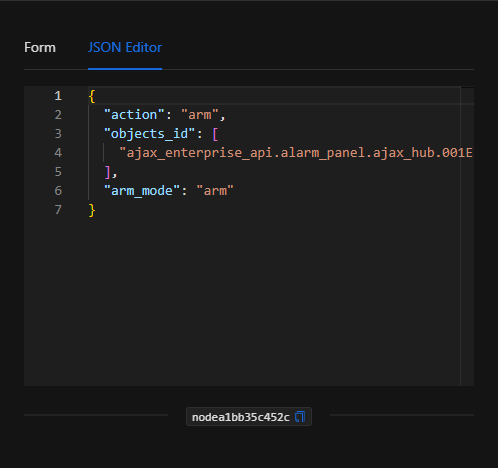
JSON Editor View
In the JSON Editor tab you can view and directly edit the structured representation of the node. It is useful for quick configurations, to parameterize with dynamic variables, or to copy configurations between nodes:
JSON Structure (Input Parameters)
Below is the JSON structure generated when configuring the node:
{
  "action": "arm",
  "objects_id": [
    "ajax_enterprise_api.alarm_panel.ajax_hub.001EF05F"
  ],
  "arm_mode": "arm"
}
JSON Fields
| Field | Type | Description |
|---|---|---|
action |
string | Operation to perform. Values: arm or disarm. |
objects_id |
array (string) | List of unique IDs of the alarm panels on which the action is applied. Accepts one or more. |
arm_mode |
string | Arm mode to apply when action is arm (for example, arm). Ignored / left empty when disarming. |
Output: Where the node's data comes from
The Alarm Node is a command-type action (it sends the arm/disarm command to the panel's driver). When the action executes successfully, the node finishes marked as successful (green border) but does not expose a structured data payload in its output; its effect is reflected in the actual state change of the alarm panel.
Therefore, to verify the result you should observe:
- The successful execution status of the node in the
Executionstab. - The new state of the alarm panel in Settings ▸ Objects or in the Dashboards / Synoptics where the panel is represented.
TIP: If you need to chain logic that depends on confirming the panel's state after arming or disarming it, use a subsequent Get Object State node to read its updated state.
Usage Examples
Example 1: Arm an industrial plant's perimeter at the nightly close
Use case: Every day at 22:00, at the end of the productive day, the plant's perimeter alarm panel is automatically armed to protect the facilities overnight.
- Trigger: Schedule node programmed at 22:00, Monday through Sunday.
- Action:
Arm - Alarm panels: Plant perimeter alarm panel (
CMI INTRADE NETSOCS) - Arm mode:
arm
Configuration JSON:
{
  "action": "arm",
  "objects_id": [
    "ajax_enterprise_api.alarm_panel.ajax_hub.001EF05F"
  ],
  "arm_mode": "arm"
}
Example 2: Disarm the alarm at the start of the morning shift
Use case: At 06:00, before the first-shift personnel arrive, the alarm panel is disarmed to allow normal access to the plant without generating false alerts.
- Trigger: Schedule node programmed at 06:00.
- Action:
Disarm - Alarm panels: Plant perimeter alarm panel
Configuration JSON:
{
  "action": "disarm",
  "objects_id": [
    "ajax_enterprise_api.alarm_panel.ajax_hub.001EF05F"
  ],
  "arm_mode": ""
}
Validation and Errors
The node performs validations before sending the command to the panel:
- Panel selection: At least one alarm panel must have been selected in
objects_id. - Valid action: The
actionfield must bearmordisarm. - Driver connection: The alarm panel's driver must be connected for the command to be applied to the physical device.
Common Errors
| Condition / Common cause / fix |
| :--- | :--- |
| No panel selected | Open the selector with Select alarm panels and check at least one alarm panel. |
| The panel does not change state | Verify that the panel's driver is connected and online. A disconnected driver prevents the command from reaching the hardware. |
| Arm mode not accepted | The entered arm_mode is not supported by that panel. Select one of the modes offered by the panel's autocomplete. |
Best Practices
- Name the node descriptively: Change the node name on the canvas to something readable (e.g., "Arm plant perimeter") to easily identify it within the flow.
- Combine with schedule conditions: To avoid arming or disarming outside desired hours, precede this node with a date/time conditional node.
- Confirm state after the action: When the operation is critical, chain a Get Object State node or a notification to confirm the panel was effectively armed or disarmed.
- Group panels: If you manage multiple panels that must always be armed together, select them all in the same node to keep the flow simple and consistent.